Create a Class
Important
Before you can create a class, you first need to prepare the Blueprint that will be used for its environment. For more details, see Create Virtual Training.
-
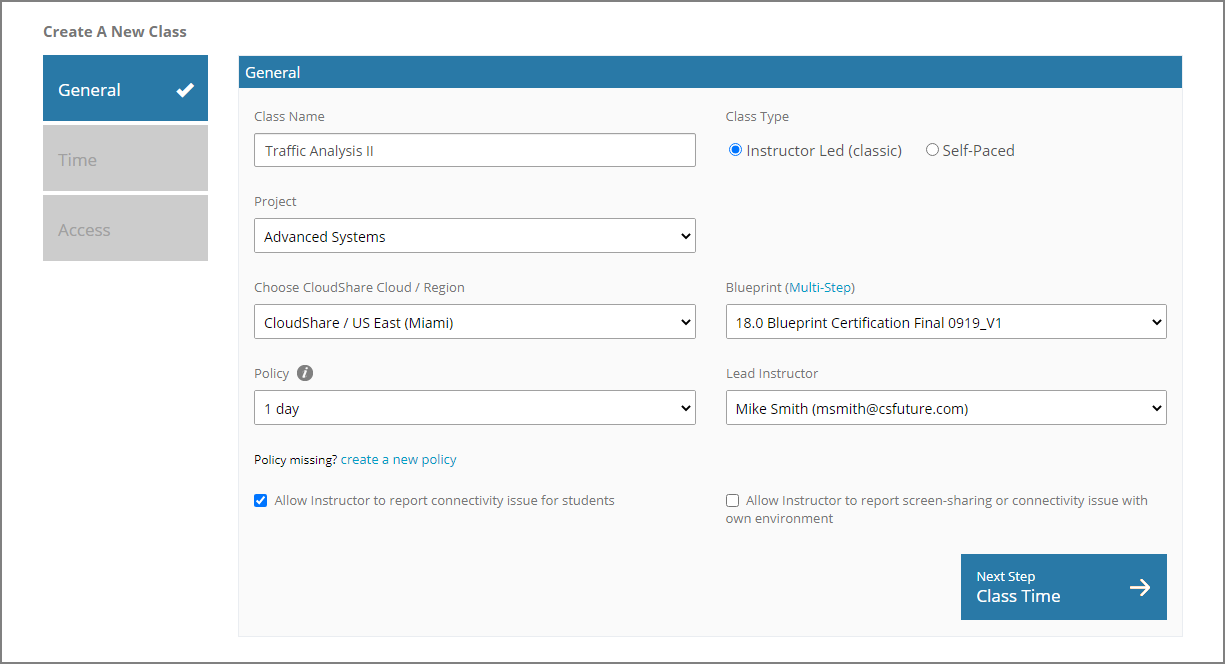
From the Training menu, select Create Class. The Create Class wizard is displayed:
-
Fill out the General details:
Field
Description
Class Name
Enter a name for the class.
Class Type
Choose from:
Instructor-Led (Classic). Students invited to this Class Type participate in the Class simultaneously with an Instructor during a preset time period.
Self-Paced. Each student invited to this Class Type can access the Class at a time that is convenient for them, until the end of the time period set for the Class. Each student has access to a personal lab, which can be used anytime during the preset time period.
Project
Select the project to be used for the class. The class will use a Blueprint and an Instructor from that project.
Team
If this appears and is enabled, select the Team that will be assigned to the Class.
Choose CloudShare Cloud / Region
If multiple regions are enabled for the project, choose which CloudShare region to launch the class from.
Make sure the Blueprint you want to use for the class is available on the region you are launching the class from. For information about working with regions, click here.
Blueprint / Multi-Step
Choose the Blueprint you want to base the class on. The students attending the class will be served copies of an environment based on the Blueprint you choose.
To optionally define a multi-step class that follows a sequence of Blueprints, click Multi-Step. For complete details on creating multi-step classes, click here .
Select External Cloud Provider Region (Displayed when using an External Cloud)
Select the Region where the external cloud provider should create the class.
This field enables you to specify a unique Region for each instance of a selected class.
The values listed will depend on your cloud provider, and on the specific Regions which are enabled for your class.
To support technical or cost considerations, classes can be restricted to usage only in selected Regions. For more details, contact your CloudShare Support representative.
Note
For Azure, only Regions which support Azure Resource Groups will be available for selection.
For more details on Regions, see the selected cloud provider's documentation.
Zone (GCP only)
For GCP, select a Zone where GCP will create the class. Each GCP Region supports different Zones.
This field enables you to specify a unique Zone, as well as a unique Region, for each instance of a selected class.
For more details on Zones, see GCP documentation.
Policy
Choose the policy that will control the runtime and storage time of each student's environment and what action is taken when the environment is inactive.
To review the policy you chose, hover over the
 button.
If the policy you need doesn't exist, click create a new policy to create one.
Lead Instructor
Select the first Instructor for this class. This is the CloudShare project member to whom all environments, as well as all usage analytics for the class, will belong. The Lead Instructor will receive an email notification of the class assignment, unless this notification is disabled in your project settings.
After the class is created, you can assign additional Instructors from the Class Details page.
Audio/Video
Activate the Utilize Audio/Video capabilities checkbox if this Class will use built-in CloudShare video conferencing features.
For complete details click here.
Additional Options
These options enable some useful reporting capabilities when a class is running.
Allow Instructor to report connectivity issue for students.
All Instructor to report screen-sharing or connectivity issue with own environment.
-
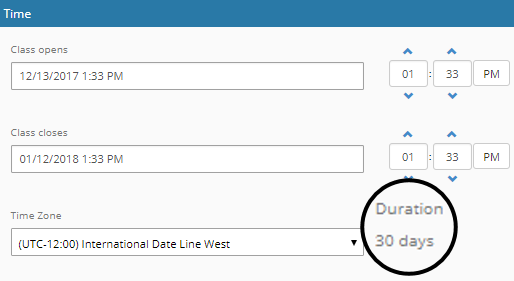
Click Next Step - Class Time and set the Class opens and Class closes times and the Time Zone. Notice that the currently selected class duration is displayed for your convenience.
-
Click Next Step - Class Access and modify the details of how students will access the class.
Note
When class creation is complete, you will be able to register students for the class.
Field
Description
Authentication Method
The class login method that will be used. Choices may include:
-
Student Passphrase - The passphrase that students will need to enter in order to enter the class.
When this option is chosen, a passphrase is automatically generated in the Student Passphrase field. The passphrase can be modified if desired.
-
Single-Sign-On (SSO) - (Available only if the class-level SSO option is enabled on the Project Details page.) Select this option to activate a pre-configured third-party SSO connection for the class.
When this option chosen, the Single-Sign-On (SSO) Connector dropdown menu will be displayed with all available connector choices. Select the connector that is relevant for the class.
Note
Classes that use LTI-based access (LMS integration) will automatically authorize the students based on the LMS authorization.
Maximum Students
Enter the maximum number of students you want to allow in the class. You will be able to add students after the class is created.
If you are creating a Self Paced class, the following additional options are available:
The Unlimited number of students checkbox will be displayed. Activating this checkbox removes any constraint on the number of students who can participate in the class. The Maximum Students field will be blank and set to read-only.
-
The Set maximum number of concurrent students checkbox will be displayed. Activating this checkbox will then display the Maximum number of concurrent students field. The total number of students who can use the Self-Paced class at the same time will be limited to the value you enter here. (If needed, you can change this value after the class is created.)
If a student attempts to log in to a Self Paced class after the concurrent limit has been reached, they will be notified: 'No more seats available, try again later.'
Note
This field may be disabled by your project settings. To enable, go to the Project Details page, click the Settings panel, and in the Class Setup section, switch on the Enable setting maximum number of students per class toggle. (Only users with the role of Project Manager or higher can change this setting.)
Allow only registered students
Selecting Yes from this dropdown menu limits class access to only those who are in your current student list.
When you select No, any unregistered user who has the class link and passphrase will be able to enter the class. They will be required to provide their email, first name and last name and will be added as students to the class. (You can still use a blocklist to prevent specified unregistered users from participating.)
Note
This field may be disabled in your project settings. To enable this field, go t the Project Details page, click the Settings panel, and in the Class Setup section, switch on the Enable permitting non-registered student access to class toggle. (Only users with the role of Project Manager or higher can change this setting.)
Choose early access options
This option controls access by students to a lab before the scheduled class time.
Enabling early access allows a student to perform such activities as uploading files, reading class materials and reviewing lab exercises.
Select from:
Allow lab access before class (default)
Allow lab access before class for Instructor only
No early access allowed
When enabled, a student can access the lab up to 30 minutes prior to class start.
When early access is disabled, if a student attempts to access the lab prior to class start time, a notification is displayed informing them that the class has not start yet.
By default, the class Instructor always has access to a lab. If the No early access allowed option is selected, the Instructor will not be able to create an Instructor Environment prior to class start.
Note
This field may be disabled in your project settings. To enable it, contact your CloudShare support representative.
Share Instructor's Cloud Folder with all students
If checked, the Instructor's Cloud Folder is shared with all students in the class. The Instructor can switch Cloud Folder sharing on and off at any time from the Instructor Console or the Class Details page.
When Cloud Folder sharing is on, the Instructor's Cloud Folder is mounted on every VM in every student's environment.
When this option is enabled in a class that has multiple Instructors, all Instructor Cloud Folders will be shared.
Note
This field may be disabled in your project settings. To enable, go to the Project Details page, click the Settings panel, and in the Class Experience section, switch on the Enable instructors to share their Cloud Folders with all students in class toggle. (Only users with the role of Project Manager or higher can change this setting.)
Important
Cloud Folder mounting requires VMWare tools. The Cloud Folder will not appear on any VMs that are not running VMWare tools.
Allow more than one environment activation per student
If checked, it will be possible for a student to access the Class multiple times using sequential environment instances.
By default, this is not checked, which means that only one environment instance can be accessed by a student for the Class.
Student Invitation Email
Click
 to edit the student invitation email. For more information, click here.
 -
-
Click Next Step - Class Location and optionally enter the class location details.
Note
The location step may be disabled in your project settings. To enable, go to the Project Details page, click the Settings panel, and in the Class Setup section, switch on the Enable setting location per class toggle. (Only users with the role of Project Manager or higher can change this setting.)
-
Click Confirm Create Class.
Your class is created and you are redirected to the Class Details page.
Once you complete class creation, you can:
Edit a Class - Edit the existing details of the class such as access settings, custom properties, team associations, collaboration capabilities, and more.
Customize the Viewer for a Class - Add resources or content and tailor the Viewer that will be used for each class.
Add Instructors to a Class - Assign additional Instructors who will assist in conducting and managing the class.
Register students for a Class - Add and invite participants for the class.
Comments
0 comments
Article is closed for comments.