Use Custom Properties for a Class
CloudShare enables you to create class-level custom properties that support use of personalized information for each student.
For example, you could define a custom property called 'Level' which stores the value of the current learning level for the student. You could than insert this property when preparing the class Overview, so that its value will be displayed uniquely for each attending student.
A custom property value can also be used to create dynamic elements, for example, as part of a URL field which points to a unique page which will used by the specified student.
Unlike System-level properties for a class, custom properties are completely optional.
Any user with sufficient Role permissions to edit a class can add or change a custom property,
Defining Custom Properties
You can define multiple custom properties for a Class using the Properties panel:
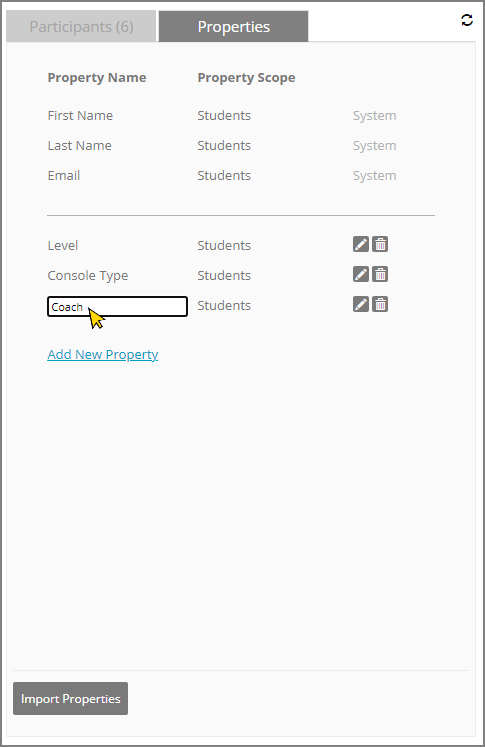
The top portion of the panel displays the mandatory properties for each student, managed by the System. You entered the values of these required properties when you added the student to the class.
The lower portion of the panel displays class-level custom properties.
Go to the Class Details page of the class where you want to add or edit custom properties.
Click the Properties tab.
Click Add New Property. A New custom property is created.
-
In the Property Name field, enter the name of the new property. This will be the label that is displayed to you when selecting properties for use in another dialog or page.
CloudShare always treats the value of custom properties as regular text.
Your entry will be stored when the cursor leaves this field.
To optionally add another custom property, return to step 2 above.
Editing a Custom Property
You can change the name of an existing property. The change will be reflected automatically wherever the custom property is currently being used.
The value specified for a custom property is assigned for each student in the class using the Edit Student popup. For details, click here.
Note
CloudShare enables an Instructor or other authorized user to edit the value of a custom property for any student while a class is already running. For details, click here.
Click Edit
 to the right of the property you want to edit to change its name. Your entry will be stored when the cursor leaves this field.
Deleting a Custom Property
Click Delete
 to the right of the property you want to delete. A confirmation message will appear that also indicates how many students are currently using the property.
Click Delete to confirm.
Importing Custom Properties
You can import a predefined list of custom properties to the current class, making it easy to create and maintain consistent properties for all classes.
The list must be stored in a standard CSV text file that contains all property names in a single column. The list should not contain a Header row.
At the bottom the Properties panel, click Import Properties. A file open dialog appears.
-
Select your predefined CSV text file and click Open. The list will be imported and the new properties will be displayed.
Note
Importing properties from a CSV text file will append them to custom properties that already exist in the Properties panel.
CloudShare enables an Instructor to change the value of an existing custom property for any student, whlle a class is already running.
This makes it simple to update or correct an existing value for a student in real time.
From the Instructor Console for the class, find the student whose custom property value you want to change.
Click Edit
to the right of the student's name. The Edit Student popup is displayed.Locate the desired custom property and change its value as needed.
-
Click Apply. The custom property value will be updated immediately.
Note
In order to see the new value for the custom property, it is usually necessary for student(s) to refresh their browser.
After you create a custom property and assign a personalized value to it, you can display the unique value set for each student by including that property in the code that is used in a class element, such as the Overview Tab:

In this case, custom properties work exactly like formatting variables.
Above, while customizing the class environment, we clicked the Coach variable to insert its custom property into the Overview page code, as seen in the left panel. When the class is running, the value assigned to that student will be displayed in the Overview text.
Comments
0 comments
Article is closed for comments.