Register Students for a Class
Once a class is created, you can add students and send them an email invitation to attend the class.
You can also assign custom properties for each student, enabling you to personalize their class experience.
Adding a Student
-
Go to Training > Classes. The Classes list is displayed.
-
Locate the class you want to register students for. If the list is long, you can use any of the search, sort or filter options to help you find the relevant class.
-
Click the Name of the desired class. The Class Details page will be displayed for that class.
-
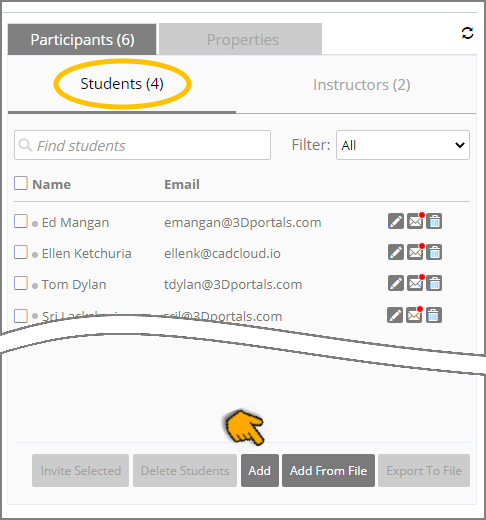
At the right of the page, in the Participants panel, click the Students tab.

-
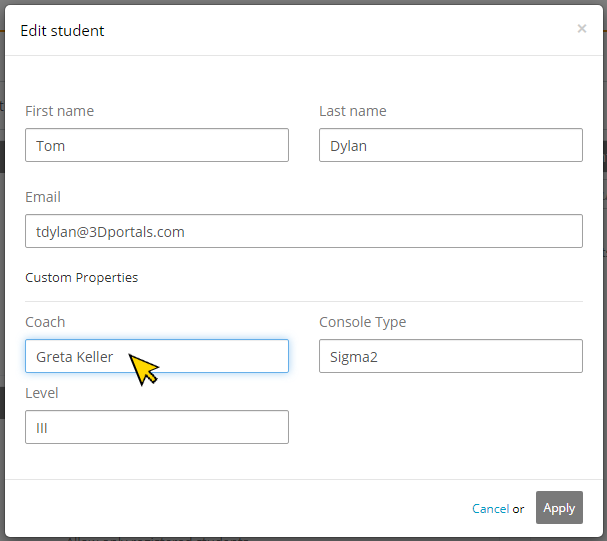
At the bottom of the panel, click the Add button. The Edit Student dialog will be displayed:

-
Enter the First name, Last name and Email for the student. These are required parameters.
Optionally enter values for any custom properties you have defined for students in the class.
-
When finished, click Apply. The student will be added to the Students list and registered for the class
Adding a Batch of Students from a File
You can quickly import a batch of students to the current class using a prepared file.
The student list must be stored in a standard CSV text file that contains columns for: Email, First Name, Last Name, and optional custom property values, respectively, as shown below:
Before importing, check to ensure that the custom properties you've included are already defined for that class.
If the CSV file does not contain a Header row, it's best to double check that any custom property values you add are in the correct column position and also of the correct type.
-
At the bottom the Students panel, click Add From File. A file open dialog appears.
-
Select your predefined CSV text file and click Open. The list will be imported and the new students will be displayed. The custom property values you've added will also be added for each student.
Note
Batch importing students from a CSV text file will append them to the students that are already listed in the Students panel.
Exporting a List of Students
You can download a complete list of students in the class, their class attendance status, and any custom property values, as a CSV text file.
-
Using the checkboxes at the left of the panel, select the student name(s) for export, or select the checkbox located above the student list to export all students.
-
At the bottom of the Students panel, click Export to File. A CSV file with the same name as the current class will be saved to your download folder.
Deleting Students from the List
You can remove one or more students from the class using any of the following methods:
-
Click Delete
 at the right of the specific student you want to delete. A confirmation message will appear. Click Delete to confirm.
 -
Use the checkboxes at the left of the panel to select the student(s) for deletion, or select the checkbox located above the student list to delete all students. Then, at the bottom the Students panel, click Delete Students. A confirmation message will appear. Click Delete to confirm.
Inviting Students to a Class
You can manually send an email invitation (or resend an email invitation) to one or more students to attend the class using any of the following methods:
Note
For details on customizing the invitation email, see Customize the Student Invitation Email.
-
Click Email
 at the right of the specific student to immediately send the currently prepared email.
 -
Use the checkboxes at the left of the panel to select the student(s) to invite, or select the checkbox located above the student list to invite all students. Then, at the bottom the Students panel, click Invite Selected. The invitation email(s) will be sent immediately.
Tip
A red dot on the Email icon indicates that no email invitation has been sent to the student from CloudShare. A green dot on the icon indicates that an email invitation has already been sent from CloudShare.


Comments
0 comments
Article is closed for comments.