Block Unwanted Users From a Class
The CloudShare Blocklist gives you complete control over class access, so that you can keep out unwanted users.
CloudShare user blocking means you no longer have to worry about disruptive attendees or a competitor joining your class. It helps to deliver a better experience for your students, without interruptions. Blocklists can also be applied to entire Projects, making them easily scalable.
Note
The Blocklist option is available only when the Allow registered and non-registered students option is chosen, and the class is accessible using a passphrase (i.e., not via a SSO provider).
A blocked user will be prevented from logging in to the class, and a brief notice will be displayed to them in the login dialog.
Students who are registered for the class will not be blocked. In addition, students who are accessing the class from a LMS (via LTI) will not be blocked.
Creating a Blocklist
Any user with permission to create or edit a class can create Blocklist rules.
Go to the Class Details page of the class for which you want to add a Blocklist rule.
-
In the Access panel, locate the Blocklist option and click the Edit
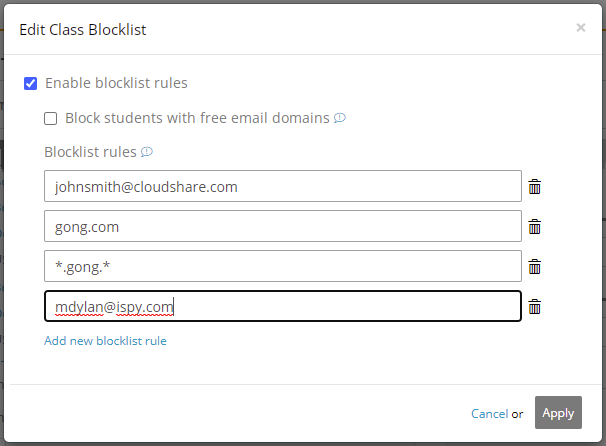
 icon to its right. The Edit Class BlockList dialog will be displayed:
Activate the Enable blocklist rules checkbox.
To optionally block any user who registers with a 'public' email domain (e.g., gmail.com), activate the Block students with free email domains checkbox.
At the bottom of the dialog, click Add a new blocklist rule. An empty textbox will be displayed.
-
Enter a new rule. You can use any of the following:
an email address from a standard business domain
a specific domain (e.g., cloudshare.com)
a regular expression – replace any domain section or part by inserting an asterisk ‘*’ sign (e.g., *.cloudshare.*)
When finished, click Apply. Your user blocking rules will be added for the class, and the Blocklist option will be enabled in the Access panel.
Tip
You can also specify default blocking for an entire Project using a Project-level blocklist. For details, see the Class Authorization section in this article.
Disabling a Blocklist
In the Access panel on the Class Details page, locate the Blocklist option and click the Edit
 icon to its right. The Edit Class BlockList dialog will be displayed.
Deselect the Enable blocklist rules checkbox.
-
Click Apply. The Blocklist option will be disabled in the Access panel.
If you disable an existing Blocklist for a class, any rules you have defined will be saved for future use.

Comments
0 comments
Article is closed for comments.