Advanced Settings
In Advanced Settings mode, the following customization activities are available to you:
Note
Whenever you change a setting for the Environment Viewer, you need to save the customization by clicking Save in the upper right corner of the page. For details, click here.
The Default tab is the first tab a user will see when opening the Viewer.
Typically, this is the Overview tab, where you can provide a basic usage description or an initial guide for a class or POC user. However, you may choose a different tab as the default tab. For example, in a SaaS training environment, you might want to set the default tab to be your SaaS tab, providing immediate access to the SaaS application.
To change the Default tab:
Click General Configurations. The Default tab dropdown list appears at the right.
From the list, select the tab that you want to be the Default tab.
You can alter the way each tab is displayed in the Viewer. When changing the layout, you can move some Viewer tabs be positioned either at the top or at the left side of the Viewer.
This option makes it easy for you to create the most productive layout for an end user. For example: placing all VM tabs at the top enables fast switching, while placing the Overview tab at the left side enables it to be viewed as an adjustable panel, side-by-side with the active VMs.
Note that VM tabs are always positioned at the top of the Viewer and cannot be moved to the Left menu.
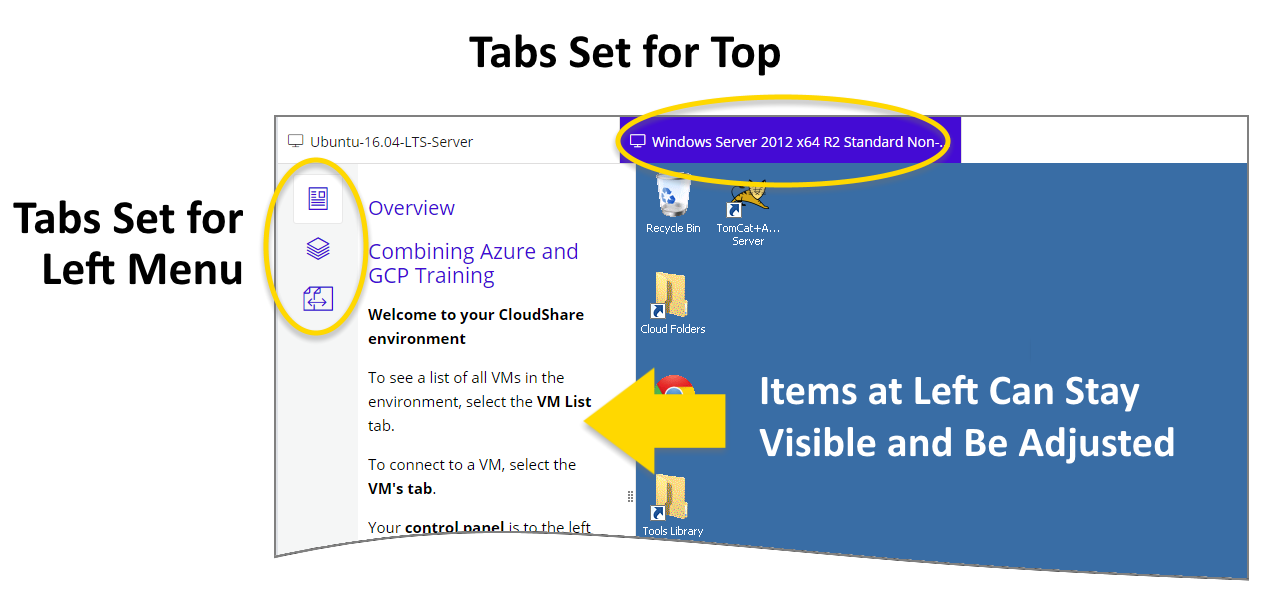
Viewing and Switching Top Tabs
Click Top tabs to see the tabs currently positioned at the top of the Viewer:
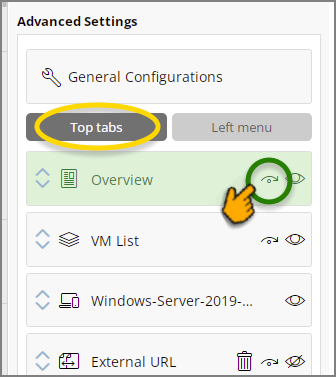 |
To move a tab that is currently positioned on the Top tabs to the Left menu, click the Switch  icon on the desired tab and click Yes on the confirmation message that appears.
VM tabs cannot be moved to the Left menu.
Viewing and Switching Left Menu Tabs
Click Left menu to see the tabs currently positioned at the left side of the Viewer:
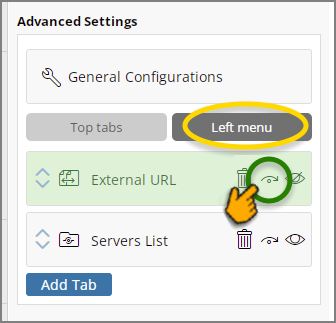 |
To move a tab that is currently positioned on the Left menu to the Top tabs, click the Switch  icon on the desired tab and click Yes on the confirmation message that appears.
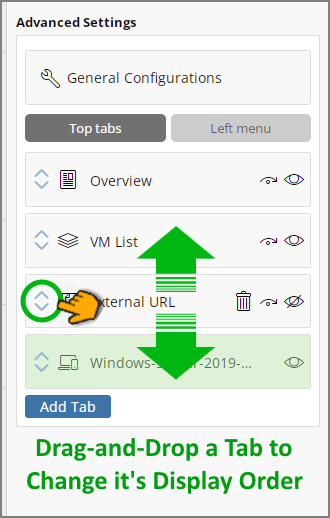
You can switch the order in which components are displayed in the Viewer Left Menu. Simply drag-and-drop a tab to position it where desired.
 |
You can hide a component from being displayed by simply clicking on the Eye icon to its right:
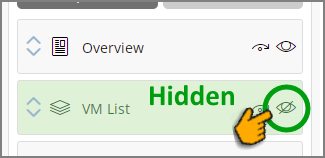 |
Click the Eye once again to unhide the component.
Typically, you'll want to customize one or more specific Viewer options for a VM in your environment.
Click the tab for a VM to show all of its editable options at the right:
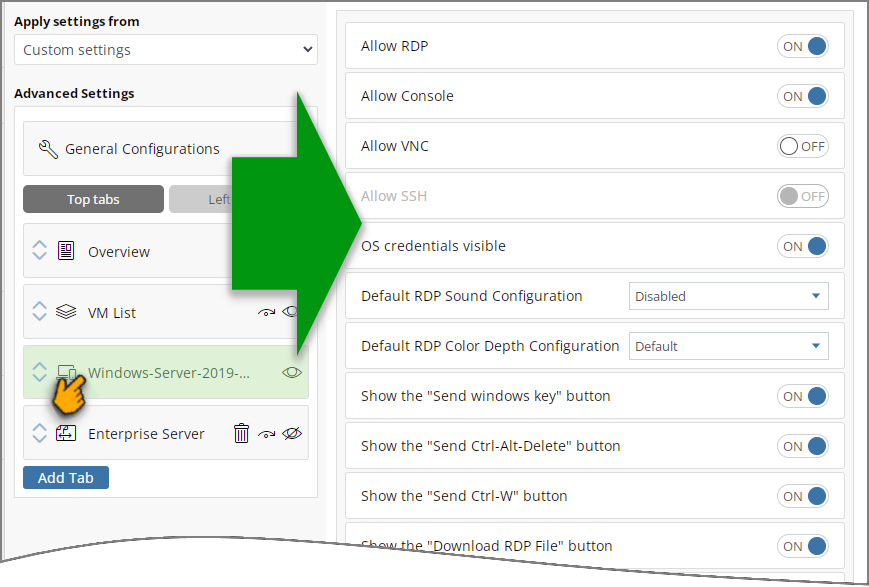 |
You can change the following Viewer settings for a VM:
Setting |
Description |
|---|---|
Allow RDP |
Set to ON to allow users to connect to the VM via RDP. For SaaS VMs, this is set to OFF and cannot be set to ON. |
Allow Console |
Set to ON to allow users to connect to the VM via Console. For SaaS VMs, this is set to OFF and cannot be set to ON. |
Allow VNC |
Set to ON to allow users to connect to the VM via VNC. For SaaS VMs, this is set to OFF and cannot be set to ON. |
Allow SSH |
Set to ON to allow users to connect to the VM via SSH. For SaaS VMs, this is set to OFF and cannot be set to ON. |
OS Credentials Visible |
Set to ON to display the VM's OS credentials in the viewer, or OFF to hide them. The credentials are displayed in the Connection Details section of the viewer control pane when the VM's tab is selected. For SaaS VMs, this is set to OFF and cannot be set to ON. |
Default RDP Sound Configuration |
(Windows VMs only) Sets the default sound playing capability over RDP. Choose from the following:
NoteIf you do not see this feature for a Windows VM, please contact your CloudShare support representative, who can enable it for you. |
Show the "Send Windows key" button |
Set to OFF to hide the "Send Windows key" button from the action panel. For SaaS VMs, this is set to OFF and cannot be set to ON. |
Show the "Send Ctrl-Alt-Delete" button |
Set to OFF to hide the "Send Ctrl-Alt-Delete" button from the action panel. For SaaS VMs, this is set to OFF and cannot be set to ON. |
Show the "Download RDP File" button |
Set to OFF to hide the "Send Ctrl-Alt-Delete" button from the action panel. For SaaS VMs, this is set to OFF and cannot be set to ON. |
Show the "Connection Details" sidebar section |
Set to OFF to hide the "Connection Details" section from the action panel. For SaaS VMs, this is set to OFF and cannot be set to ON. |
Start tab in full screen |
When set to ON, the tab opens initially in full screen mode when selected. Once the tab is open, the user can toggle between regular and fullscreen mode as usual. If the user navigates away from the tab and back again, the tab opens again in full screen. |
When the environment is configured with a SaaS template VM, the SaaS Template tab will also appear in the Tabs list:
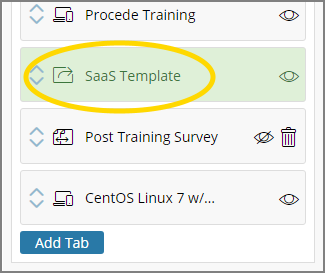
You can change some of the same settings that are configurable when customizing a VM tab as detailed here.
In addition, you can access the following settings for each SaaS Template tab.
Custom Variables
You can use custom variables to build dynamic SaaS URLs for each Class that is created with the environment and personalize access to your SaaS or web service per participant.
To add a variable, place the cursor at the desired location of a URL path. Then, from the Add formatting variables section, click a variable. It will be added it to the path:
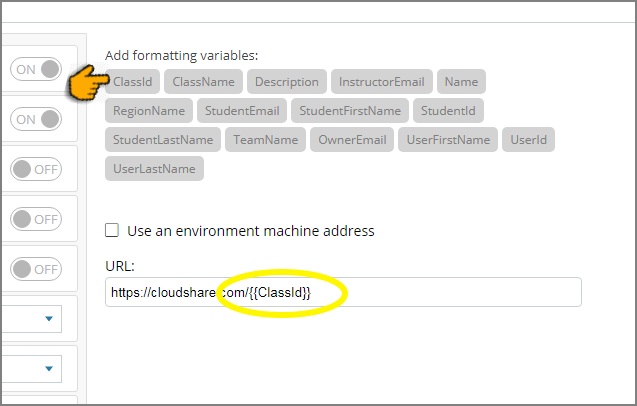
When the SaaS URL is invoked at runtime, each variable will be replaced with its assigned value.
Environment Machine Address
Activate the Use environment machine address checkbox and configure the unique environment address settings for running the SaaS application. For specific settings details, click here and refer to step 6.
Participants URL
Enter the URL that a student or prospect will be directed to when they navigate to the SaaS machine's tab. They will not be able to browse away from this URL.
Typically, you will want to enter the login page for your application, where each participant logs in using their own unique credentials.
You can use one or more custom variables to construct a participant URL. The URL must begin with a HTTPS prefix.
It takes a few minutes for the URL change to take effect.

Comments
0 comments
Article is closed for comments.