Run the Tests
How you test your connectivity depends on where you are testing from. CloudShare provides two distinct scenarios for testing:
Testing remote access before logging in to CloudShare
Testing CloudShare Viewer connectivity after logging in to CloudShare.
Before you connect to a CloudShare environment or experience at all (or If you are not able to connect at all), you can test your remote access to ensure that your system currently meets minimum access requirements for using CloudShare.
-
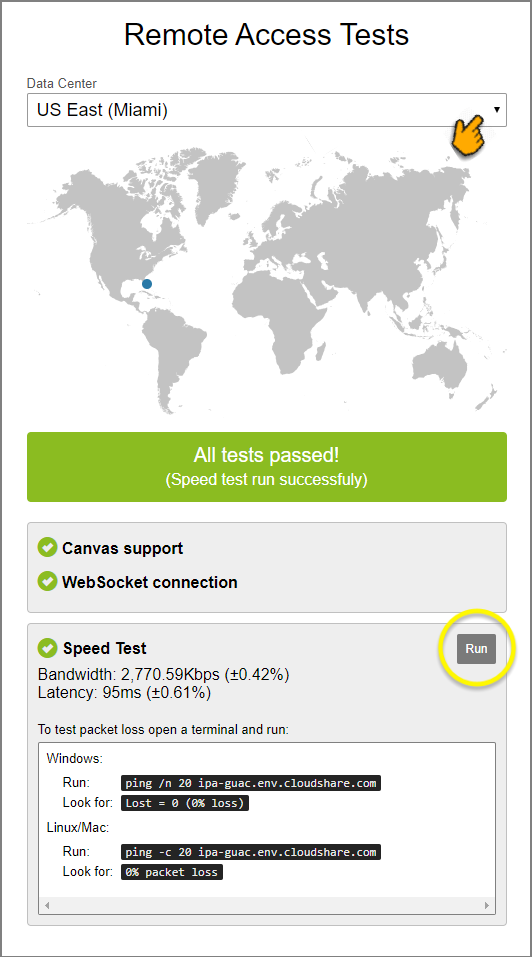
Click this link to perform remote connection testing: CloudShare Remote Test Page. The Remove Access Tests dialog will appear:
Note
If your experience is not being deployed in a US Data Center, use one of the following URLs to run the test:
-
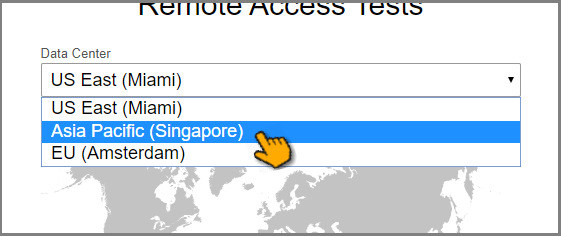
From the Data Center dropdown list, select the Data Center with which you want to run your connectivity tests:
Note
Testing begins immediately after you make your selection.
Canvas Support and WebSocket Connection tests should complete successfully before you proceed to the next step. If they do not succeed, one or more suggestions on how to resolve the issue will appear in the dialog. For more details, see the article Review Test Results.
-
In the Speed Test section of the panel, click Run.
The speed test produces the following results for analysis:
Bandwidth - the performance speed of your connection measured during the test. The example above shows 2770.59 Kb per second.
Latency - the time it takes for a test data packet to make the round trip from your computer to the designated remote server and back again. (This is also referred to as 'ping' time.) The example above shows 95 milliseconds latency.
For more details on test results, see Review Test Results.
-
To optionally look at packet loss statistics:
Open a command terminal on your computer.
Click the + sign to reveal the commands you should use for testing, based on your operating system.
-
Copy and paste the relevant command line into the local terminal and press enter.
Examine the results that appear in the terminal, which shows whether any test packets failed to reach their destination.
A successful packet transmission will show 0% loss.
For more details on test results, see Review Test Results.
If you are already connected to a CloudShare environment or experience and are getting very slow response times or communications dropouts, you can test your connection from directly inside your CloudShare Viewer to help determine what the problem is.
-
On the left side of the CloudShare Viewer, from the Connectivity menu, select Connectivity Test:
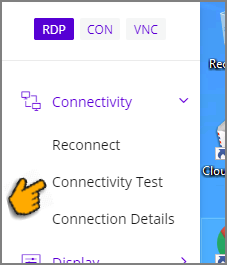
The Connectivity Test popup will be displayed.
-
The first time you test connectivity for the current browser, both WebSocket and Speed Tests will run automatically, and their results will be displayed:
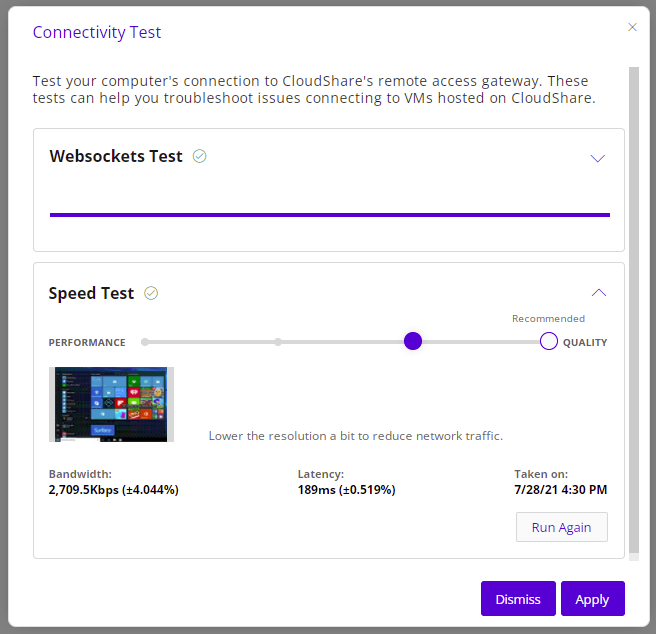
To run the Speed test manually, near the lower right corner of the dialog, click Run Again:
-
Examine the results.
-
Click the angle bracket
 icon at the upper right corner of the WebSocket test results panel. A successful test result will be have a green checkmark to the right. A test that has failed will have red checkmark.
When possible, a suggestion will be provided by the dialog on how to resolve the issue. For more details, see the article Review Test Results.
-
Speed Test results will show the overall performance rating for the connection. For more details, see the article Review Test Results.
Tip
You can adjust your computer's performance using the slider widget that appears in the test results. For complete details on applying performance improvements, click here.
-

Comments
0 comments
Article is closed for comments.