Complete the Setup
Make sure you are logged into a Salesforce administrator account.
Enter the Setup area by clicking Setup at the top right of the page.
Under the Build menu, expand Customize and then expand Opportunities and then select Page Layouts.
-
Click the Edit button for the page layout in which you want to make the CloudShare invitation functionality available.
You are now in the Enhanced Page Layout Editor.
-
Drag the Section user interface element from the palette in the upper portion of the screen onto the page layout in the lower portion of the screen, and drop it at the position where you want to place a new section for creating CloudShare invitations.
The Section Properties dialog pops up.
Enter CloudShare Invitations as the Section Name and choose 1-Column for the Layout.
Click OK.
From the menu on the left of the palette in the upper portion of the screen, select Visualforce Pages.
Drag the Visualforce page called CloudShare Invitation and drop it onto the CloudShare Invitations section you created.
Click the section's wrench icon to open the section properties, and set the page height to 250 pixels. Make sure not to check Show label.
Click OK.
From the menu on the left of the palette in the upper portion of the screen, select the Related Lists menu and add the Invitations list to the Related Lists part of the page.
-
Click the wrench icon for the Invitations list to open the Related List Properties for the list. Leave the Invitation Name field in the Selected Fields list and add the following additional fields from the Available Fields list:
Invitation Status
Environment Status
Invitation Expires
Email
First Name
Last Name
Project
Region
Blueprint
Altogether, you should have a total of ten fields selected. (This is the limit.)
Still in the Related List Properties - Invitations dialog, expand the Buttons area and deselect New.
Click OK.
Click Save to save your layout, and then click Yes to confirm the change.
Go to the Opportunities tab and open an opportunity.
-
Find the CloudShare Invitations section that you created on the Opportunity page and provide its configuration settings:
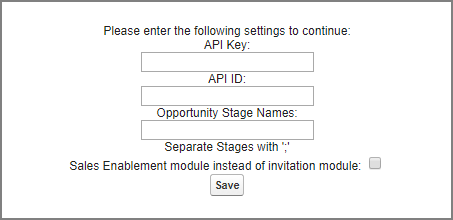
Note
If you are upgrading an existing Salesforce package installation that is already integrated with the Sales Enablement module, you need to activate the checkbox for Sales Enablement module instead of invitation module in these settings.
Typically, you only need to complete these settings during the initial setup, or when you want to change the value of a setting.
Click Save.
You're now done with the initial setup and your sales engineers can start sending invitations. You can change your configuration any time.
Comments
0 comments
Article is closed for comments.